Table of Contents
Java Swing Graphics #
In this lesson we introduce graphics in Java. Obviously GUIs are graphics, so what are we doing now that’s different? Well, in the GUI programming we’ve done so far, the GUI components (e.g. JButton, JLabel, JFrame, …) have drawn themselves. Now our code will do the drawing. However, the mechanism for drawing is actually the same, whether it’s done by API code or by our own code.
paintComponent() #
In Java’s Swing library, all drawing is done by callback methods. In other words, a JComponent-extending class that wants itself drawn overrides the JComponent method:
protected void paintComponent(Graphics g);
and the Event Dispatch Thread will call that method whenever it deems that the component needs to be drawn. When would that happen?
-
A system event, like a window being resized, uncovered, etc. could cause the Event Dispatch Thread to call
paintComponent. -
Some code in your program might call your component’s
repaint()method, which will cause the Event Dispatch Thread to, at its earliest convenience, call your component’s paintComponent method. -
Some code in your program might call
repaint()on a component that contains your component, which will cause the Event Dispatch Thread to, at its earliest convenience, call that container’spaintComponentmethod, which will in turn call the paintComponent methods of the components it contains. -
The
Graphics gparameter topaintComponentis the thing you use to do the actual drawing. It has methods for drawing rectangles, ellipses, … , text, and images.
Overriding paintComponent() #
According to the above, all we have to do to draw on a component is to override its paintComponent method. So … let’s do that!
import java.awt.*;
import javax.swing.*;
public class Ex0Frame extends JFrame{
GraffitiButton gb;
public Ex0Frame(){
super();
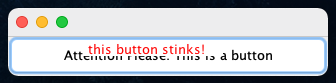
gb = new GraffitiButton("Attention Please: This is a button");
gb.setPreferredSize(new Dimension(320, 40));
this.add(gb);
this.pack();
this.setDefaultCloseOperation(JFrame.EXIT_ON_CLOSE);
}
private class GraffitiButton extends JButton {
public GraffitiButton(String s) {
super(s);
}
protected void paintComponent(Graphics g) {
// Draw the button as normal.
super.paintComponent(g);
// Make a white rectangle on top.
g.setColor(Color.WHITE);
g.fillRect(75, 5, 140, 15);
// Write a String in red.
g.setColor(Color.RED);
g.drawString("this button stinks!", 80, 18);
}
}
public static void main(String[] args) {
Ex0Frame f = new Ex0Frame();
f.setVisible(true);
}
}
When you run this program, you get the following output.
Repainting #
Now let’s suppose we want to grafiti the button only after the button is clicked? We will need to add some logic to our GraffitiButton where the paintComponent simply calls the super method initially, and then after click, a different painting occurs. For this operation we’ll need to call repaint() in our action listener, after altering a boolean flag.
import java.awt.*;
import java.awt.event.*;
import javax.swing.*;

public class Ex1Frame extends JFrame{

    GraffitiButton gb;
    public Ex1Frame(){
        super();

        gb = new GraffitiButton("Attention Please: This is a button");
        gb.setPreferredSize(new Dimension(320, 40));


        gb.addActionListener(new ActionListener(){
                public void actionPerformed(ActionEvent e){
                    gb.graffiti=true; //set to graffiti
                    gb.repaint(); //repaint the component
                }

            });

        this.add(gb);
        this.pack();
        this.setDefaultCloseOperation(JFrame.EXIT_ON_CLOSE);
    }

    private class GraffitiButton extends JButton {
        boolean graffiti=false;

        public GraffitiButton(String s) {
            super(s);
        }

        protected void paintComponent(Graphics g) {
            // Draw the button as normal.
            super.paintComponent(g);

            // Only graffiti the button if flag is set
            if(graffiti){
                // Make a white rectangle on top.
                g.setColor(Color.WHITE);
                g.fillRect(75, 5, 140, 15);

                // Write a String in red.
                g.setColor(Color.RED);
                g.drawString("this button stinks!", 80, 18);
            }
        }
    }


    public static void main(String[] args) {
        Ex1Frame f = new Ex1Frame();
        f.setVisible(true);
    }
}
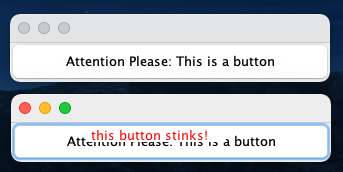
Note that in the above example, calling repaint() method causes paintComponent() to be called again, even after initialization. The second time, the graffiti flag is set, causing different elements to be painted on the button.
Graphics2D and the awfulness of backwards compatibility #
At some point Java improved its graphics API, but it didn’t want to get rid of the earlier stuff (for backwards compatibility reasons), so … they derived a new class Graphics2D from Graphics (polymorphism in the works), and paintComponent’s argument is actually of that new type. However, you have to cast g to Graphics2D explicitly when inside paintComponent if you want to use the new(er) Graphics2D stuff. For us, the nice feature of Graphics2D is that there are methods:
void draw(Shape s);
void fill(Shape s);
that give you outlined or filled-in versions of any object implementing the Interface Shape. And, of course, the API has Shape-derived objects for rectangles and ellipses and lines and more exotic things as well. Here’s the exact same program as before, but done with Graphics2D calls.
import java.awt.geom.*;
import java.awt.*;
import java.awt.event.*;
import javax.swing.*;

public class Ex2Frame extends JFrame{

    //... rest of code (see above)

    private class GraffitiButton extends JButton {
        boolean graffiti=false;

        public GraffitiButton(String s) {
            super(s);
        }

        protected void paintComponent(Graphics g) {
            // Draw the button as normal.
            super.paintComponent(g);

            //convert to graphics 2d object
            Graphics2D g2 = (Graphics2D)g;

            //only graffiti the button when the flag is set
            if(graffiti){
                // Make a white rectangle on top.
                g2.setColor(Color.WHITE);
                g2.fillRect(75, 5, 140, 15);

                // Write a String in red.
                g2.setColor(Color.RED);
                g2.drawString("this button stinks!", 80, 18);
            }
        }
    }
Some of the many different graphics operations #
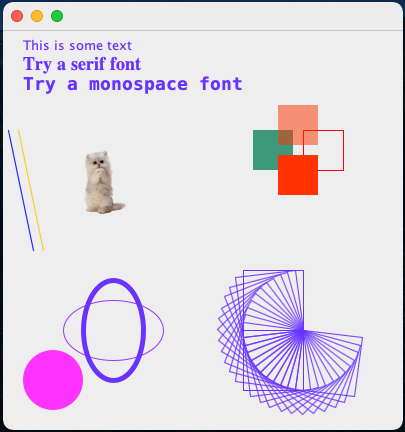
Of course you wouldn’t normally draw over a JButton, as we did in the previous examples. You can draw on any JComponent. If you just want a blank space to draw on, you can just extend the base JComponent class. In the example below, we define a DrawArea in this way, and we show off some of the many things you can do with Java graphics. (Note: we use the file catr.png)
Here’s the visual below.
And as to not clutter these notes too much, click below to reveal the code.
Animation #
To animate graphics, we combine a thread with our repainting procedures. This may seem simple and straightforward, and it is! Let’s look at an example that animates a circle up and down in the area.
import java.awt.*;
import javax.swing.*;
import java.awt.geom.*;

public class Ex4Frame extends JFrame {

    AnimateArea aa;
    AnimateThread at;

    public Ex4Frame(){
        super();
        aa = new AnimateArea();
        at = new AnimateThread(aa);
        this.add(aa);
        this.pack();
        this.setDefaultCloseOperation(JFrame.EXIT_ON_CLOSE);
    }

    public void animate(){
        at.start(); //star the thread
    }

    //animation area
    private class AnimateArea extends JComponent{


        double x=200,y=200; //initial location of the dot
        final double dw=20,dh=20; //width/height dot
        double dir=1; //moving down (-1 moving up)

        final int width=400,height=400; //width/height of animate area
        public AnimateArea(){
            super();
            setPreferredSize(new Dimension(width, height));
        }

        public void changeDir(){
           dir *= -1;
        }
        public void moveDot(){
            //move in a direction, turn around if off the area
            double new_y = y+dir*10;
            if(new_y > height || new_y < 0){
                changeDir()//turn around!
                new_y = y+dir*10;
            }

            y=new_y;
        }

        protected void paintComponent(Graphics g){
            super.paintComponent(g);
            Graphics2D g2 = (Graphics2D)g;

            g2.setColor(Color.RED);
            g2.fill(new Ellipse2D.Double(x,y,dw, dh));
        }
    }

    //animation thread
    private class AnimateThread extends Thread{
        AnimateArea d;
        public AnimateThread(AnimateArea d) {
            this.d = d;
        }

        public void run() {
            while( true ) {

                try {
                    Thread.sleep(20); //wait 20 millis
                } catch (Exception e) {}
                d.moveDot();//move dot
                d.repaint(); //repaint
            }
        }
    }

    public static void main(String[] args) {
        Ex4Frame f = new Ex4Frame();
        f.setVisible(true);
        f.animate(); //star the animation thread
    }
}
And this is what the output of this looks like
Mouse Interaction #
As you develop programs with custom graphics, you will likely want to start tracking how the user interacts with your program. We have covered WindowListeners (actions on windows) and ActionListeners (actions on objects), but we can do even more by tracking how the mouse is actually used with a MouseListener.
The required methods that need to be realized for a MouseListener are
public interface MouseListener
  //Invoked when the mouse button has been clicked (pressed and released) on a component.
  public void mouseClicked(MouseEvent e);

  //Invoked when the mouse enters a component.
  public void mouseEntered(MouseEvent e);

  //Invoked when the mouse exits a component.
  public void mouseExited(MouseEvent e)

  //Invoked when a mouse button has been pressed on a component.
  public void mousePressed(MouseEvent e)

  //Invoked when a mouse button has been released on a component.
  public void mouseReleased(MouseEvent e)
And like with WindowListener which has a realization with empty methods, namely WindowAdapter, we can use a MouseInputAdapter that does the same for MouseListener (plus also implments extra features in MouseInputListener.
Now we have everything in place to modify the above example such that when you click on the screen, the ball changes direction and starts moving where you click.
public class Ex5Frame extends JFrame{

//... see code above

//animation area
    private class AnimateArea extends JComponent{


        double x=200,y=200; //initial location of the dot
        final double dw=20,dh=20; //width/height dot
        double dir=1; //moving down (-1 moving up)

        final int width=400,height=400; //width/height of animate area
        public AnimateArea(){
            super();
            setPreferredSize(new Dimension(width, height));

            //add a mouse listener
            this.addMouseListener(new MouseInputAdapter(){
                    public void mouseClicked(MouseEvent e){
                        x = e.getX(); //set the ball to x and y
                        y = e.getY();
                        changeDir(); //also change the dirction
                    }
                });
        }

       //... see code above

   }

   //... see code above
}
Java I/O #
A common place where Java programmers first really experience inheritance and polymorphism in action is with I/O (input/output), so let’s take a look at it now. Not only is it something you should know as a Java programmer, but it gives us a nice case study in object oriented design. So we’re going to first try to understand the problem: what requirements do we really have of an I/O system? Then we’ll see how the Java IO package’s object oriented design meets those goals.
Reading … What’s the problem? #
I/O (input and output) is kind of what programs are all about. If we couldn’t instruct the program as to our intentions or we couldn’t somehow perceive the results produced by the program, what would be the point in running it? In this lesson we look at byte and character I/O — I/O concerning files, buffers in memory, network connections, things like that. GUI I/O will be covered later.
Designing a system for handling I/O is a daunting problem for language/library/API developers. These operations are so ubiquitous in programs that getting it wrong means making pretty much every program anyone ever writes more difficult, and getting it right means making pretty much every program anyone ever writes easier. So, let’s consider some desirable properties, some design goals, regarding reading, i.e. the “input” half of I/O. In particular, we’ll look at stream-oriented input and output.
-
Bytes or chars or tokens? Fundamentally, all data in the modern computing world is byte-oriented, and oftentimes we want to read data that way. On the other hand, often we want to read textual data - i.e. data that is character-oriented. In C, where char’s and bytes are synonymous, we don’t need to distinguish between the two. In Java, however, where characters are unicode and not generally single-byte values, we very much have to distinguish between the two. Sometimes the programmer will want to read bytes, sometimes characters, and sometimes tokens - like the textual representations of doubles or booleans.
-
Treat multiple sources of input in a uniform way Input can come from many different sources: files, network connections, standard in, strings, arrays of bytes, arrays of characters, pipes. etc. We saw in writing C that writing functions that took an
FILE *stream argument, which could equally take ainputfilestreamorstdin, was a powerful idea. This is just an example of the power of treating multiple sources of input in a uniform way, i.e. with one programming construct that applies to many different actual sources of input. -
Flexibility to add new operations, improve efficiency, or modify input streams on the fly: With something as universally used as stream-oriented I/O, there’s no way to design a system that will meet everyone’s needs all of the time. Therefore, the system needs to provide programmers the flexibility to change how things work without abandoning or breaking the whole system.
Bytes, Chars or Tokens? #
The Java I/O design takes into account issue 1 from the above in a typically OOP way, by having three separate classes of input objects.
- abstract class InputStream for byte-based input.
int read(); //returns an int from 0 to 255 //or -1 if at the end of the stream int read(byte[] b, int off, int len); void close(); ... - abstract class Reader for character-based input
int read(); //returns an int from 0 to 65535 //or -1 if at the end of the stream int read(char[] cbuf, int off, int len); void close(); ... - class Scanner for token-based input
String next();
int nextInt();
double nextDouble();
...
As a programmer, you have to figure out how you want to read data in. Would you like to read a byte or chunk of bytes at a time? Then you want an InputStream object. Would you like to read a character or chunk of characters at a time? Then you want a Reader object. Would you like to read a token at a time, e.g. a double at a time or String at a time or boolean at a time? Then you want a Scanner object. So far, we’ve focused on reading tokens (an int or word or float) at a time.
Treat multiple sources of input in a uniform way #
Here’s how the Java IO system uses OOP to allow multiple sources of input to be treated in a uniform way. First of all, the InputStream and Reader classes are abstract. They are the roots of class hierarchies. Specific sources of bytes of data give rise to classes that extend InputStream. For example, in the API we have:
           InputStream
               ^  ^
              /    \
             /      \
FileInputStream   ByteArrayInputStream
So if, for example, you want to write code to search for the bytes 0x7F 0x45 0x4C 0x46, which indicates the beginning of a Executable and Linkable Format (ELF) file (i.e. an executable file in Unix, or what gcc compiles a program into 😜), you would write your method to take an InputStream argument. That way the same method works for both files and byte arrays.
Similarly, specific sources of characters give rise to classes that extend Reader. For example, in the API we have:
              Reader <-._
             ^   ^       \____
            /     \           \
           /       \           \
StringReader  CharArrayReader  InputStreamReader
So, if you wanted to write code to count the number of non-alphabetical characters in text, you would write that method to take a Reader argument. That way the same method works for Strings, arrays of chars and (and this is interesting!) any InputStream — because we can make an InputStream the source of characters for a Reader via the InputStreamReader class! If you look at the API documentation for InputStreamReader, the InputStreamReader constructors take an InputStream as a parameter. And yes, if you’re wondering System.in is an InputStream, so you can create an InputStreamReader from System.in.
Finally, we have our good friend the Scanner.
Class Scanner has constructors that take InputStreams or Readers as arguments. So if you wanted to write code to do something like add all the integers in some text, you would write that method to take a Scanner as an argument. That way it would work with files, byte arrays, char arrays or Strings. Putting this together, if you have a file whose name is “data.txt” and you want to read in tokens from it (e.g. ints and double and booleans and strings), you would create a scanner for it like this:
Scanner sc = new Scanner(new InputStreamReader(new FileInputStream("data.txt")));
/*                                              \_____________________________/
                                                 an InputStream whose bytes
                                                 come from file data.txt
                         \____________________________________________________/
                          a Reader whose chars come from the bytes in data.txt
             \_________________________________________________________________/
    a Scanner whose tokens are made up of chars whose bytes come from data.txt
*/
There are some shortcuts to all of this. So-called “convenience methods” to make, for example, a Reader directly from a file name.
Two important points here:
- Technically there is no
Scannerconstructor that takes aReaderas a parameter. Instead, it takes an object that implements theReadableinterface. However,ReaderimplementsReadable, so this constructor works withReaders, but is in fact a bit more general than that.- The
Scannerconstructor that takes an InputStream as an argument is actually just a convenience thing. You only really need the constructor that takes aReaderas an argument. Why is that enough?
Flexibility to add new operations, improve efficiency, or modify input streams on the fly #
Finally we get to the third and last of our design goals: the flexibility to add new operations, improve efficiency, or modify input streams on the fly. When we want to modify or extend functionality in OOP, what do we always do? We use inheritance. I’ll give you two examples of where this is done in the Java API, one to modify behavior and one to add functionality.
The first is the class BufferedReader. The issue BufferedReader addresses is this: when a call to read() is made for a Reader that has, for example, a file as its ultimate source for data, that call results at some lower level in a system call to fetch that byte. At this low level, however, fetching a byte-at-a-time is tremendously inefficient. It typically takes as much time to fetch something like 1024 or 2048 bytes as it does a single byte. Therefore, it would be nice to have a variant of Reader that would fetch, say, 1024 bytes into a buffer the first time read() is called, then dole those out one-at-a-time for each read() call until the buffer is emptied. Only then would it go back to fetch more bytes from the lower-level — another chunk of 1024. That’s what the class BufferedReader does. What’s kind of funny is that it does it as a wrapper around another Reader. In other words, BufferedReader is a Reader that takes a Reader and wraps it in this buffering scheme. So for example, if you had a file data.txt to read tokens (e.g. integers) from, and you were worried about performance, you might create your Scanner like this:
Scanner sc1 = new Scanner(new BufferedReader(new InputStreamReader(new FileInputStream("data.txt"))));
The BufferedReader will make calls like read(buff,0,1024) to its underlying InputStreamReader, which will make a call like read(buff,0,1024) to its underlying FileInputStream, which will result in a lower-level system call to fetch the next 2024 bytes from the file. The object oriented design of Java’s I/O package makes this possible. By deriving BufferedReader from Reader, the Java authors provide modified functionality that can be used anywhere a regular Reader can be used.
The second example to look at is the class LineNumberReader, which is much easier to explain. Sometimes you want to be able to ask what line you’re on as you read input. The BufferedReader is a great class that buffers the input for you, making the reading process more efficient by making less calls to the input stream. However, it doesn’t track things like what number you are on. It’s an extra piece of functionality you might wish a BufferedReader had. The class LineNumberReader extends BufferedReader to provide just that, and it takes any Reader as input. We can create one like this:
LineNumberReader reader = new LineNumberReader(new InputStreamReader(new FileInputStream("data.txt")));
… and whenever you want to know what line number you’re on you can call r.getLineNumber(). Once again, the object oriented design of Java’s I/O package makes this possible. By deriving LineNumberReader from BufferedReader, the Java authors provide new functionality that can use any type of input stream, yet still track the lines that have been processed. What if you still want a Scanner? You can create one for each line that your new reader returns:
LineNumberReader reader = new LineNumberReader(new InputStreamReader(new FileInputStream("data.txt")));
String line = reader.readLine();
while( line != null ) {
  Scanner sc = new Scanner(line);

  // read your tokens for whatever you need!
  // ...

  line = reader.readLine();
  System.out.println("You're on line " + reader.getLineNumber());
}
We could dive deeper into the weeds here and talk about what would happen if you wrap a Scanner around a LineNumberReader (new Scanner(new LineNumberReader(...))). While this is allowed (it’s a Reader!), you kind of lose the line number functionality because the Scanner is using the buffered characteristics of the reader here, and it reads ahead while you’re calling its next() methods. If you ask for the line number, it will often be too far. Still, it could be useful in getting the general line number if not the precisely correct one.
And then …
And then we should probably look at the Errors and Exceptions that all these > methods from all these classes throw … but we won’t. You can do that on your own!
A short note on output #
Output is fundamentally a bit easier than input. Why? Because with output your code knows what it wants to write, so it controls the outgoing bytes. With input, your code doesn’t know what’s coming. It must react and adapt to the incoming bytes. So we’re not going to describe output in as much detail.
Similar to the input case, we have two separate hierarchies for output: the hierarchy rooted at OutputStream, which is for byte-oriented output, and the hierarchy rooted at Writer, which is for character-oriented output. The distinction is a bit blurrier than for the input case, because the class PrintStream, which is derived from OutputStream, provided methods for writing int’s, double’s, String’s, etc., as does PrintWriter, which is derived from Writer. The distinction has to do with how characters are encoded as bytes: PrintStream using the JVM’s default encoding and PrintWriter allowing the programmer to independently specify that encoding. These are distinctions we won’t go into here. Note, however, that System.out and System.err are both PrintStream objects.
Just to round out this example, let’s look at what it would take to write “Hello World” to a file.
PrintWriter pw = new PrintWriter(new File("output.txt"));
//Note that we are not specifiying a character set. Java defaults to unicode

pw.println("Hello World!");
pw.close(); //close the file
As you can see, printing/writing is much more straightforward than reading.